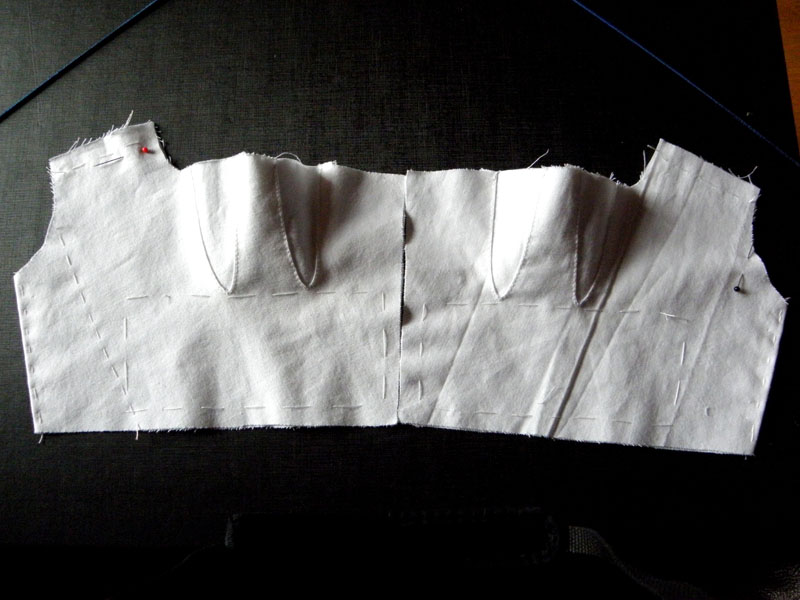
Corset corto

Frente del corsé

Tiene razón mi madre en que tardo más en ponerme a hacer las cosas que en hacerlas 🙂

Después de un par de semanas sin hacer nada, me puse a hacer el corsé, con un patrón de Sense and Sensibility. Los godets para el pecho los cosí a mano para asegurarme de que quedaban todos iguales, porque con este patrón hay que hacer tres piezas(refuerzo, exterior y forro) y después montarlas y coserlas por las costuras. No quedé nada contenta con cómo me quedó, tanto por el patrón (no me da la sensación de que vaya a «levantar y separar» hasta el punto que se ve en los cuadros) como por los errores que cometí al coser. Las costuras que aparentemente quedaban bien encaradas mientras estaban hilvanadas, al coserlas con la máquina se escurrieron dos milímetros, y para más inri, cuando ya había puesto los canales para las ballenas y hecho los ojales, me dí cuenta de que los pechos no quedaban sujetos. Como ya estaba un poco hasta los mismísimos, pregunté a las corseteras de corsetmakers en LJ, y me dieron un montón de consejos sobre cómo arreglarlo. Resultó que había cogido el patrón dos tallas más grande de lo que necesitaba (después de haber tenido que reducir ya otras dos tallas por un error al tomar las medidas) y tenía que reducir los godets del lado derecho, así que tocaba empezar de cero. Tras un par de días de descanso me puse a despiezar lo que ya tenía hecho, con la idea de ver si al menos la espalda, lados y tirantes se podían reaprovechar. En este caso la idea era pasarme las instrucciones por el forro, y usar un truquillo que ya había visto en Corsetmakers con los corsés modernos y que mi tía (modista con más de 45 años de experiencia en una boutique de Barna) me recomendó: usar sólo exterior y forro, el primero reforzado con entretela adhesiva; después de todo, el patrón que estoy usando no tiene una construcción acorde a la época (se cose a máquina), así que si me salto algun detalle histórico más no pasa nada, siempre que la silueta sea la de la época. 🙂
Pero no podía ser tan sencilla la cosa, y me puse a hacer lo que aún no había hecho: investigar. Como quería terminar rápido de hacer el vestido había decidido seguir sin más las instrucciones del patrón y se acabó, pero he comprobado que así no quedo contenta, así que aprovechando que estaba cosiendo el velo para el traje medieval, lo compaginé con buscar información sobre el proceso de construcción de un corsé de esa época. Como de costumbre, acabé encontrando lo que buscaba en la página de Koshka the cat 🙂 El sistema es prácticamente igual al del corsé que hice para el DPP del año pasado, y desde mi punto de vista y experiencia, más sencillo que coserlo con la máquina, además de que es más fácil corregir errores.
Con esto, nuevo cambio de planes: reaprovechar las piezas que se puedan para hacer tres capas igual, sin entretela, pero con el sistema de construcción antiguo.

Y a ello me puse: ajustar las piezas salvables y cortar de nuevo las que no. Coser los godets, hilvanarlo y volver a probármelo. Esta vez fui un poco lista y para abrocharlo por delante durante la prueba recorté la tira de tela donde iban los ojetes en el viejo y se la hilvané 🙂 Después de tener que hilvanar dos veces más porque se me deshacía, comprobé por fin que esa talla me quedaba bien, y sólo tenía que corregir los tirantes. Y ahora estoy en el proceso de poner cordón en lugar de ballenas para estar más cómoda, excepto la central para que al atarlo no se me deforme.

§§§§§§§§§§§§§§§§§§§§§§§§§§§§

I never thought that making a simple regency stays for myself, with a commercial pattern, would be so difficult.

I bought the Sense and Sensibility pattern and tried with it. I handsewed the godets so they would be perfect and the three layers were identical, but when I sewed them together the seams shifted and I wound up with an ok stays on the outside, but very ugly in the inside. I was not happy, neither with my inability to sew something without making mistakes, nor with the look of the stays. I tried it on and realized that it didn’t support me, and at that moment I was so blocked that I had to ask the Corsemakers community at LJ for some advice. They were really helpful, and thankfully the problem was only that I had used two sizes more than I needed (I’m still baffled about that, I’ve re-checked it a lot of times and I still get the same size I was using), so I unpicked it and left the pieces alone for some time while I was working in other proyects. My idea was to remake it using only two layers, the outside one lined with fusing interlining as I had read in other Corsermakers posts about modern corsets. It wouldn’t be period, but the original instructions of the pattern aren’t either.

But it couldn’t be so easy, and I decided to do some research about period construction of stays. I found the site of Koshka the cat and realized that the period way was easier than the modern one (I don’t like machine sewing ^^; ) and changed my mind again. Now I’m finally working on the stays, stuck at the cording (no cord until I can go buy it XD), but sure that this size fits me, as I basted it together and tried it on before sewing it this time.

Double Period Project 2011 II

Después de dar vueltas al proyecto del DPP para este año, he dedicido hacer borrón y cuenta nueva y hacer los dos vestidos para el concurso a tamaño real. ¿Por qué? Pues es muy sencillo: el año que viene es el aniversario tanto de la Constitución de 1812 (más conocida como «La Pepa») como del hundimiento del Titanic en 1912 y probablemente habrá alguna recreación en el foro de Anacrónicos, y si puedo pagarme los viajes ya tendré adelantados los trajes 🙂
Otras dos novedades con respecto al concurso del año pasado es que, primero, voy a ir apuntando los costes del proyecto (telas, encajes, adornos, tiempo empleado,etc), porque siempre es interesante saber a cuánto asciende el gasto y cuánto podría costar algo así si se encargase; y segundo, voy a intentar ir explicando cómo hago las cosas en vez de poner comentarios generales.

¡Estad atentos, en junio comenzaremos! 😀

§§§§§§§§§§§§§§§§§§§§§§§§§§§§§§§§§§§§§§§§§§§§§§§§§§

I’ve been giving a lot of thougth to this year’s DPP, and I’ve decided to begin from scratch and make the two entries life-sized. ¿Why? Because next year is  the 200 aniversary of the first Spanish Constitution (also known as «La Pepa») and also the 100 aniversary of the Titanic,  and there would probably be some reenactment, and having the garb done it would be easiest to assist.
Also, there are going to be two diferences in the new dress diaries: I’m going to note all costs of this project, so people could know how much it costs to do something like it, and I’m going to be more specific in terms of garment construction, with some explanations.

Stay tuned, we will begin on june! 😀

Note for the English readers: English is my second languaje and I’m still learning, so if can’t understand something don’t hesitate to tell me!

Double Period Project 2011

Este año los diarios de costura para el DPP serán bilingües, para no dejar fuera a aquellos que no tienen buen dominio del inglés 🙂

Acabo de terminar con el DPP y ya empiezo de nuevo. Este año voy a intentar participar en las dos categorías, que han cambiado con respecto al año anterior:

1912

No es para nada mi época, de hecho hasta hace muy poco lo habría considerado demasiado moderno para ser interesante, pero precisamente por eso sera un reto. De momento ya tengo las telas y sólo me queda hacer el diseño definitivo y decidir y dibujar el bordado que llevará. Por suerte será tamaño BJD y no tan complejo para no poderlo terminar a tiempo.

1812

¡Viva la Pepa! XD El estilo imperio es de mis favoritos y además uno de los proyectos que tenía pendientes de hacerme para mí, así que voy a aprovechar y darle una pequeña vuelta de tuerca. En las bases se permite que traje no sea completamente histórico, y me voy a aprovechar de ello; de momento sólo diré que va a ser para una muñeca tamaño Dahl (ligeramente menor que una Barbie) y que además del traje completo tendrá todos los accesorios necesarios.

§§§§§§§§§§§§§§§§§§§§§§§§§§§§§§§

This year the DPP has changed periods, and here we go again! This time I’ll try to have an entry ready for each category.

1912

Not my period at all. I know almost nothing about fashion more recent than 19th century, so it’s going to be a challenge. I already have the fabric for this, and now I have to do the definitive design and think how I want to embroider it. The dress will be BJD size again, so I can have it ready on time.

1812

Regency is my favourite style and I already had in mind making a dress in it for myself, so I’m going to go for something a little more special. The rules allow not being completely historically accurate, and I’ll take advantage of it. At the moment I’ll only say that it’s going to be Dahl size (a little smaller than Barbie) and that I’ll do a complete ensemble whit all the accesories.

Wrapping up the project

Finished polonaise

Flickr album (photos courtesy of Blanca Amores)

References used:

Books
• Moda. La coleccion del instituto de la moda de Kyoto. Varios. Ed. Taschen
• The cut of women’s clothes, 1600-1930. Nora Waugh. Ed. Faber and Faber
• Corsets and Crinolines. Nora Waugh. Ed. Taylor & Francis Ltd
• Seventeenth and Eighteenth-Century Fashion in Detail. Avril Hart, Susan North. Ed. V&A Publishing
• Patterns of fashion: v.1. Janet Arnold. Ed. Pan Macmillan

Extants
• IMATEX. Centre de documentacio i museo textil. (http://imatex.cdmt.es/)
o Jubon Ref:11531
o Cotilla Ref:11882
o Cotilla Ref:11883
o Cotilla Ref:11884
o Jubon Ref:11530
• Catalogo Museo del Traje CIPE. http://museodeltraje.mcu.es/
o Polonesa Inv. CE000592
o Polonesa Inv. MT000905

Websites
• Isis Wardrobe: polonaise pattern scan:  http://isiswardrobe.blogspot.com/2009/09/18th-century-curiousity.html
• Your Wardrobe Unlocked (subscription only):
– c.1775 Dress: The Bodice. Serena Dyer: http://yourwardrobeunlockd.com/component/content/article/412-c1775-dress-the-bodice
-Setting in 18th century sleeves. Katherine Caron-Creig: http://yourwardrobeunlockd.com/component/content/article/377-setting-in-18th-century-sleeves-by-katherine-caron-greig

Finally, I begin the polonaise

Museo del Traje Polonaise: Nº INV. MT000905

The stays are finished (tomorrow I’ll post photos of the lining on my flickr account), and I’ve begun working in the last piece: the polonaise. The photo on the left is my model for this, and it’s been difficult finding a pattern that resembles it, so I’ve done it myself. I first draped the lining, but I made a mistake and cut it without seam allowance, so I only could use it to make a pattern. Then I made a pattern in paper for the rest of the polonaise and tried it on the doll. It was perfect except for the lengt and now I only have the pattern for the sleeves left to do, so… back to work!

Only the lining left!

Pair of bodies

This is how the pair of bodies are going to look like!

The binding was more difficult than I thought, so I just finished it this morning. Thankfully, I still have the rest of December and all January to finish this project, so I spect to have it in time for the contest.

Pair of bodies

Pair of bodies, almost finished

Pair of bodies, almost finished

I have almost finished the definitive pair of bodies. I only have left binding, welting and sewing the lining.

I’ve made a lot of mistakes  with it, I should have changed the pattern so the four back pieces where only two, because I almost hadn’t had space for the lacing holes. Regardless of all, it looks really good! I hope to have it finished by the end of the month (not a lot of time to work on it), so I can begin with the bodice.

Petticoat finished


Petticoat

Petticoat


I just finished the petticoat. It gave me some problems, because I used the pattern for the underpetticoat, but I forgot that it was shorter. Thankfully, it has a flounce and it gives it the length I need.Now I’ll finish the stays before I continue with the bodice, so I can get a perfect fit.

I only have one concern: ¿would the false rump be able to support all the weight of the three layers?

«Cul de France»

False rump

False rump

I had finished the two front panels of the definitive stays when I began to feel bored and decided to use the mock-up to continue working in the rest of the garment. I’ve already finished the false rump or «cul de France» (that name makes me giggle like a kid) and have well advanced the underpetticoat.
I’m using satin ribbon for the ties in the false rump and underpetticoat to reduce bulk.

I’ve also begun to give some thought to the decorations. I’m thinking about making some braided cords with silver embroidery thread and lilac beads I have in my stash for the shoulders.

Robe à la Polonaise – the stays I

Stays - 1st try

I’m beggining to hate sewing stays. Today I finally finished the mock-up, and tomorrow I’ll begin with the definitive stays.

I’ve used the instructions on Cherry Dawson website, but working only with two layers, so the fashion fabric doesn’t show the boning channels when finished.

I’ve been lucky and only had to adjust the two front pieces from the original pattern (they fit perfect at the bust, but the waist was a little big) and the placement of the boning channels.

More photos in my flickr 🙂